FAQ Frequently Asked Questions
Do you have a question about IDX Broker or RealtyCandy services? Are you wondering how to use our IDX Addons? Have any questions about what we could do for your real estate site? You're not alone, but we have the answers.
Here are the most frequently asked questions we receive. Please contact us if you don't see your question here.
Questions aboutRealtyCandy
We offer integrations for IDX Broker and existing websites called IDX Connect. If you have a website already that you want to integrate with IDX Broker, this is the service you’re looking for.
PureIDX sites designed for IDX Broker: available for all of our clients on https://idxaddons.com/
We also offer Simply IDX sites, where you can select the design you like, let us set it up for you, and integrate your IDX Broker account. Then, all you have to do is add your content. You can see more info about our Simply IDX sites here.
We have a WordPress Hosting service, included with the Simply IDX sign-up package. Our hosting includes Daily Backups, Security Scans, WordPress Updates, Weekly Theme, and Plugins Updates, RealtyCandy Support, SSL Security certificates, 10 GB of Storage, 25,000 Monthly visitors, Administrator Access, and more! (If you prefer to host your site elsewhere and still sign up with us for Simply IDX, that is also an option.)
We also do IDX Broker Customizations, so you can have unique tools for your website that take full advantage of what IDX Broker has to offer.
We also offer our “free apps”, such as:
- IDX Addons: this is a website we made for our clients to get more out of IDX Broker with our tools like Speedy IDX Widgets, Text Alerts, Returning Visitor Alerts, Nearby Listings, Data Graphs, Mailchimp Integration, and more!
- Our Premium IDX Templates for IDX Broker pages: use RealtyCandy as your IDX Broker developer to get access to all our templates for FREE.
You can read up on what we offer here.
View QuestionWe charge $79 to connect IDX Broker to any platform website; including WordPress, Wix, Weebly, SquareSpace, Webflow, Duda, and more!
View QuestionAn IDX Connect is what we at RealtyCandy call an IDX Broker integration for any website; including WordPress, Squarespace, Wix, Weebly, etc.
Our IDX Broker set up on your site will make your IDX Broker pages match your website and integrate them in a way that makes it very difficult for users to tell they’re even navigating off of your site.
View Question- Setup of the omnisearch tool on the home page
- We set up all the IDX Broker pages to use the header and footer of your existing site and match the styling of your site.
- We configure the settings on the IDX Broker admin backend for you.
- You get access to our tools at https://idxaddons.com.
- You get our Premium IDX templates at no charge.
- You get access to our Free WordPress Theme, Simply IDX.
- We will help you set up your custom subdomain, like search.myrealtygroup.com instead of myrealtygroup.idxbroker.com.
First, visit https://signup.idxbroker.com/d/realtycandy to signup right now. IDX Broker will send you the forms that your MLS requires you to sign to activate your service within a few minutes.
Once you send the signed forms, they will be sent to your MLS for authorization.
After the MLS office authorizes your data feed, IDX Broker will configure your account on their servers and send over your username and a link so that you can set your password.
Within one business day of getting the username and password from IDX Broker and access to your website, we can do the IDX Broker setup and optimization on your website.
To sign up and pay a one-time fee of $79 for our integration service, please visit https://realtycandy.com/idx
View QuestionThe signup process only takes 3-5 minutes. Most of the MLS in the United States will then authorize your data feed for public use within 1-3 days of you signing up, then IDX Broker will remove the access code so your pages are public in about 1 day.
We find that in most cases, this whole process takes about 2-3 business days. If you’re like some of our other clients and you have a friendly MLS or board of Realtors, it is possible to have IDX Broker set up on a real estate website in less than one day.
Our integration service is typically completed within 1-3 business days of signup.
View Question- First, you go to realtycandy.com/platinum and signup for the IDX service. (When you use that link they waive their $99 account creation fee)
- IDX Broker will send you (and us) an email where you can set up your password. Once you do this, please send us your IDX Broker password.
- IDX Broker will also send over the paperwork that you need to sign or have your broker sign.
- Once you get that done and send it back to IDX Broker, they will forward all of the documents to your MLS for approval.
- Click on the sign-up button on this page to hire us to set up your IDX feed to your site.
- Send an invite to give administrator access to your site to our email address, info@realtycandy.com
- Once we have your IDX account active, your payment, and the login credentials, we just need one business day to get IDX Broker set up to your website.
Typically this entire process takes about 2-3 business days.
We have had a World Record in the past where some MLS areas give approval in just one business day.
Some MLS can hold up the process a little, but it is usually completely done within one week.
If you’re having trouble with this step, we recommend reaching out to your MLS as soon as they should have received the documents.
View QuestionYou can do that by simply sending an email to developers@idxbroker.com that says “I want to use RealtyCandy as my IDX developer.” It is fast, free, and easy.
When you do this, we will become your first contact for IDX Broker support issues and you will get Our Maxima Map Search, premium IDX page templates, and our other tools at no charge from us. Your payments will stay the same and you will continue to pay IDX Broker directly.
To access all of our free tools, log in to IDXAddons.com using your IDX Broker API Key; found under Access Control when you log in to the IDX Broker Dashboard.
If you sign up for your IDX Broker account using our sign-up form link, you will automatically be set up with RealtyCandy as your IDX Broker developer.
View QuestionYes! We love doing great customizations for IDX Broker. We’ve also done customizations directly on website platforms like WordPress, Squarespace, Wix, and Webflow. Our specialty is building new IDX Add-ons and apps for clients that work on any platform.
We charge $150 per hour and bill in 1/2 hour increments minimum. Our developers typically complete about one hour of custom work per business day per client site.
If you want to hire us for a RUSH PRIORITY PROJECT, we charge $300 per hour, start within one business day, and work about twice as long per day on the site.
You can read more about our Customization process here and see some of our past customization projects on our Portfolio page.
View QuestionThere will be a chat icon on our website that allows you to chat real-time with our team or you can email us at support@realtycandy.com or even write us on our Contact page at any time.
You can also give us a call at (435) 222-5522 between 9 AM and 5 PM Mountain Time.
View QuestionQuestions aboutIDXConnect
We charge $79 to connect IDX Broker to any platform website; including WordPress, Wix, Weebly, SquareSpace, Webflow, Duda, and more!
View QuestionAn IDX Connect is what we at RealtyCandy call an IDX Broker integration for any website; including WordPress, Squarespace, Wix, Weebly, etc.
Our IDX Broker set up on your site will make your IDX Broker pages match your website and integrate them in a way that makes it very difficult for users to tell they’re even navigating off of your site.
View Question- Setup of the omnisearch tool on the home page
- We set up all the IDX Broker pages to use the header and footer of your existing site and match the styling of your site.
- We configure the settings on the IDX Broker admin backend for you.
- You get access to our tools at https://idxaddons.com.
- You get our Premium IDX templates at no charge.
- You get access to our Free WordPress Theme, Simply IDX.
- We will help you set up your custom subdomain, like search.myrealtygroup.com instead of myrealtygroup.idxbroker.com.
First, visit https://signup.idxbroker.com/d/realtycandy to signup right now. IDX Broker will send you the forms that your MLS requires you to sign to activate your service within a few minutes.
Once you send the signed forms, they will be sent to your MLS for authorization.
After the MLS office authorizes your data feed, IDX Broker will configure your account on their servers and send over your username and a link so that you can set your password.
Within one business day of getting the username and password from IDX Broker and access to your website, we can do the IDX Broker setup and optimization on your website.
To sign up and pay a one-time fee of $79 for our integration service, please visit https://realtycandy.com/idx
View QuestionThe signup process only takes 3-5 minutes. Most of the MLS in the United States will then authorize your data feed for public use within 1-3 days of you signing up, then IDX Broker will remove the access code so your pages are public in about 1 day.
We find that in most cases, this whole process takes about 2-3 business days. If you’re like some of our other clients and you have a friendly MLS or board of Realtors, it is possible to have IDX Broker set up on a real estate website in less than one day.
Our integration service is typically completed within 1-3 business days of signup.
View Question- First, you go to realtycandy.com/platinum and signup for the IDX service. (When you use that link they waive their $99 account creation fee)
- IDX Broker will send you (and us) an email where you can set up your password. Once you do this, please send us your IDX Broker password.
- IDX Broker will also send over the paperwork that you need to sign or have your broker sign.
- Once you get that done and send it back to IDX Broker, they will forward all of the documents to your MLS for approval.
- Click on the sign-up button on this page to hire us to set up your IDX feed to your site.
- Send an invite to give administrator access to your site to our email address, info@realtycandy.com
- Once we have your IDX account active, your payment, and the login credentials, we just need one business day to get IDX Broker set up to your website.
Typically this entire process takes about 2-3 business days.
We have had a World Record in the past where some MLS areas give approval in just one business day.
Some MLS can hold up the process a little, but it is usually completely done within one week.
If you’re having trouble with this step, we recommend reaching out to your MLS as soon as they should have received the documents.
View QuestionYou can make our email support@realtycandy.com as a contributor by going at your WIX panel, click on the website and then on the arrow beside Site Actions, click on “Add Contributor”.
View QuestionQuestions aboutIDX Templates
To get any of our premium templates for your IDX pages, all you have to do is to make us your IDX Broker developer. This process is fast and FREE.
Just send an email to IDX Broker that says you’d like to use Realty Candy as your developer or sign up for your IDX Broker account using our sign-up form.
Your payments with IDX Broker will continue as they are, directly to IDX Broker. You will also have access to IDXAddons.com at no charge.
Contact us here if you have any questions about this process!
View QuestionYou can go to https://middleware.idxbroker.com/mgmt/preferences#search and check the option to “Show Loading Screen For Searches” as well as the option to “Show Logo on Loading Screen”.
View QuestionYou can set the logo at https://middleware.idxbroker.com/mgmt/preferences#other under “Client Logo URL”.
View QuestionTo change the basic fields (the ones at the top) you go to https://middleware.idxbroker.com/mgmt/pages and on the line of the page you want to edit, click on the Edit link under the Preferences column, then go to the “Search Setup” tab and there you can hide/show the fields you want and set the default values for any fields.
For the Advanced fields (the ones at the bottom), click on the Fields link under the Customize column. There, you select the property type you want to change the fields and then on the “View Settings” button. You will then see the fields below. There you can set the default values, change how the field will look, add new fields, remove and move any fields.
View QuestionThat information is provided by our Agent Information Add-on for Single-Agent accounts. To change it you just login at https://idxaddons.com with your IDX Broker API Key and go to Apps then Agent Information.
If you have a Multiple-Agent/Office account, you can change the agent’s information at https://middleware.idxbroker.com/mgmt/agents and your Office information at https://middleware.idxbroker.com/mgmt/account.
View QuestionYou can log in to your IDX Broker account, go to Design > Website > Custom CSS and on the Categories or Pages tab, select the Details page and just add this code to show the navigation:
#IDX-detailsTopNav { display: block !important; }
To hide the navigation, the code is:
#IDX-detailsTopNav { display: none !important; }
View Question
Yes, log in to your IDX Broker account, go to Design > Website > Custom CSS and on the Categories or Pages tab, select the Details page and just add this code:
.IDX-detailsAddressLocationInfo { display: block !important; }
View Question
Yes, just log in to your IDX Broker account, go to Design > Website > Custom CSS and on the Categories or Pages tab, select the Details page and just add this code to show it:
#IDX-detailsHotAction-print { display: block !important; }
To hide the Printable Flyer button, the code is:
#IDX-detailsHotAction-print { display: none !important; }
View Question
Yes, for this you need to go to your IDX Broker account, then click on Design > Website > Custom CSS and on the Categories or Pages tab and add this code:
#IDX-fieldsWrapper { display: block !important; }
View Question
First, check if you added the key correctly at: https://idxaddons.com/?page=api-keys
If it still doesn’t show, please add this code to your Custom CSS section under Design > Website > Custom CSS and on the Categories or Pages tab:
#homeValue { display: block !important; }
View Question
Questions about IDXAddons
IDXAddons.com is a valuable resource for real estate professionals, offering a range of free tools and features designed to enhance your real estate website’s performance, navigation, design, and functionality. It is particularly beneficial for those using IDX Broker, a popular platform for integrating MLS listings into real estate websites.
Key Features and Benefits:
1. 50+ Widgets and Extensions: IDXAddons.com provides access to over 50 widgets and extensions specifically tailored for IDXBroker users. These tools empower you to optimize your real estate website’s functionality, making it easier for visitors to search for properties and navigate your listings. With a simple setup using your IDX Broker account and API key, you can unlock these valuable resources.
2. Exclusive IDXBroker Templates: Choose from a diverse selection of more than 60 templates for results pages, maps, property details, and agent rosters. These templates come in various designs and are optimized for mobile devices, ensuring seamless viewing and user-friendly experiences on smartphones, tablets, and desktops. Personalize your website with these templates to match your brand and showcase your listings effectively.
3. Single Property Websites: IDXAddons.com enables you to create professional single property websites dedicated to your featured listings. These dedicated websites are an excellent way to highlight individual properties, providing potential buyers with in-depth information, high-quality images, and immersive experiences. By offering single property websites, you can effectively market and sell your listings.
Explore IDXAddons.com today to elevate your real estate website and provide a superior online experience for your visitors.
View QuestionYou will get our Premium IDX Templates, our Simply IDX theme for WordPress, and all our Add-on Tools for IDX Broker.
View QuestionThe OmniSearch tool is a search bar that simplifies how to look up information by encompassing multiple filters and criteria, usually located in the home page header.
It can be configured at IDXAddons.com or through the plugin IMPress for IDX Broker in WordPress websites.
How Does the OmniSearch look?
We actually have several different styles to choose from. Plus, they're all available for free to our clients through IDXAddons.com
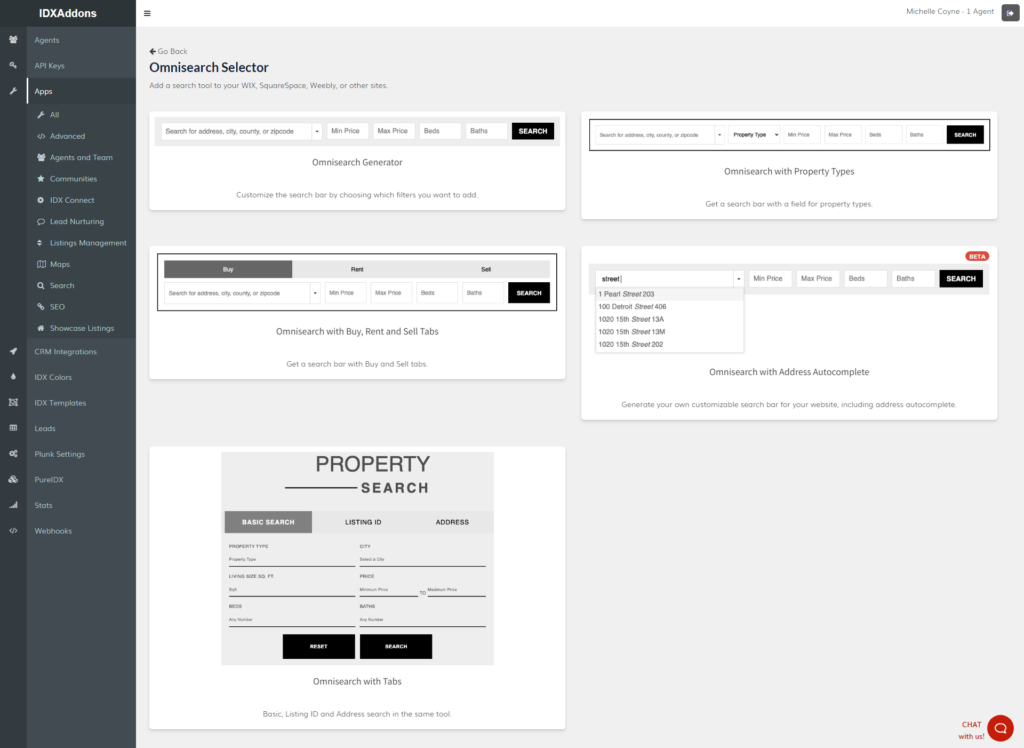
You can also choose to disable specific fields like beds/baths if, for example, you only sell commercial properties. Or maybe you just want a cleaner look for your home page.
Our search tools also have sections to add additional CSS as well as change the colors to more easily match your branding and site style. If you want something you're not sure how to make, our developers can also create custom search tools to look and behave however you need them to.
First, you need to add an HTML block. Set it to “full width” and approximately 200px-250px for the height, then check the option “code” and add this code below, replacing the code with the code generated for you on https://idxaddons.com/?page=apps&sub=omnisearch:
<!DOCTYPE html>
<html lang="en">
<head>
<meta charset="UTF-8" />
</head>
<body>

SCRIPT_HERE

</body>
</html>
After you save it, don’t forget to check the mobile version, and adapt its height accordingly.
View QuestionThe Saved Link Generator is a free add-on from IDXAddons.com that allows users to generate links for listings in bulk by inputting tags to link all relevant options and removes the need to create individual links for each appropriate listing, filtering out the ones that don’t match the tags.
Here are some useful tutorials:
Simply IDX is the name of the theme we developed for WordPress users.
It uses BeaverBuilder to make a site that is quick and easy for clients to customize. We allow all of our users to download this theme for free on IDXAddons.com.
View Question
Speedy IDX Widgets is a free add-on tool for all IDX Broker clients from IDXAddons.com. The Speedy IDX Widgets reduce the sizes of all the listings images on your Showcase and Carousel widgets from IDX Broker, improving the bounce rate.
That means when clients load your site with a carousel of 25-50 pictures of properties, it doesn’t take several minutes just to get a portion of one page on your site to load.
By reducing the image files down to the size they appear on each page, the end result looks the same but loads much faster. This leads to more users staying on your site and makes them more likely to continue browsing, improving your SEO results. It’s also highly customizable compared to the native IDX widget, allowing you more options when deciding what to reduce.
View QuestionText Alerts is a great tool that allows you to receive a text every time a visitor registers (or a visitor who’s made an account returns) to let you know the last page they were viewing on your site. Alternatively or additionally, you can receive an email (sent daily) listing all of the new and returning visitors of the day at once.
First, configure the Webhook, also found in our list of IDXAddon apps. Then, just input and confirm your phone number and/or email and use the checkbox to toggle these alerts on and off at IDXAddons.com.
Webhook is a code snippet you will need to configure for the Text Alerts to work (including the daily email report).
First, you need to be logged in to IDX Broker to access the Sub-header page. Then click on the button to turn WYSIWYG off. Copy the code from the Webhook page at IDXAddons.com, paste it into the IDX Broker Sub-header page, and save the page.
After the code has been saved, you can go back to the IDXAddons Webhook page and verify that the Webhook is working through the “Validate” button.
View QuestionWhat is IDXAddons.com?
IDX Addons is the dashboard where you can find all of our IDX Broker Templates, Addons, and SEO tools. All RealtyCandy clients have access to this dashboard. We created it, it is hosted on our servers and connects to our clients' IDX Broker accounts using their API key.
It is not the same thing as the IDX Broker dashboard, where users can change the configuration of their settings, create filters for widgets and saved links, and activate new templates on their site.

How do I log in to IDXAddons.com?
To log in, you will need to copy and paste your API Key from IDX Broker.
First, log in to the IDX Broker dashboard and navigate to Home > Access Control. You should see a green box labeled as the “Account API”. Go ahead and click that box to copy the code to your clipboard.
Next, head over to IDXaddons.com and paste the API key, then click login.
From here, you should see all the Apps we have available for you to use, the PureIDX theme options if you host one of those sites with us, and the IDX Colors app to easily change colors on all of your IDX Broker pages when using our templates.
How can I get free apps for my IDX Broker account?
If you're a RealtyCandy client, you have access to IDXAddons already! If not, you can check out this page and follow the email instructions to have IDX Broker add RealtyCandy as your account developer and give you access to all of these tools for FREE.
Can I see some examples of useful IDXAddons apps?
Sure! We have tons of tutorials on our YouTube channel if you're looking for something specific. We also offer IDXAddons tours to all of our clients at RealyCandy. Here, you can go through IDXAddons.com with one of our team members virtually. We'll walk you through the setup for any apps or tools that interest you for your site.
One of our most popular apps is called Speedy Widgets. This app both speeds up the load time for your listings widgets and allows you to apply custom styling using a variety of theme options. We're always expanding our options to include more themes, so check with our team if you have something particular in mind.
I tried to log in, but it didn't work. How do I get access to IDXAddons.com?
You need to have an active IDX Broker account to utilize our IDXAddons. Once you have that, you can choose two methods to get Premium access to IDXAddons.com.
- Pay a yearly subscription cost when you sign up. ($399 per year)
- Add RealtyCandy as the developer partner on your IDX Broker account. (FREE)
When you make us your developer partners, your payments will continue as they are directly to IDX Broker. You will also remain in control of your website design changes, hosting, and everything else.
Having RealtyCandy as your developer partner means that we will be your first point of contact for anything related to IDX Broker. This helps in providing you with faster customer support. You will also have Premium access to ALL of all tools (templates, IDX Addons, and IDX Chat).
Contact us if you have any questions.
Questions about Pure IDX
PureIDX is a cloud-based website that we offer for all of our clients with a simple setup. You pay only $99/year to have one of these sites, with the option of a FREE DIY setup, or a customized setup from our team for only another $200. This means you can have a fully functional site with IDX integrated for only $299 total.
It is a totally mobile-responsive real estate website designed to work exclusively with IDX Broker. It has 6 templates available (as of Nov 2022) with limited customizations on the layouts, but hosting is only $99 per year for life.
You can check examples of websites build using PureIDX on our PureIDX Portfolio page.
There are tons of new features being added for these sites constantly, since we created them to be used with our addons. If you have any questions about these sites, please contact our team.
PureIDX is intended for single realtors or agencies that want a fast, simple website. If you only need a home page, and most of the other pages will be IDX Broker pages anyway, PureIDX is for you!
View QuestionTo have a PureIDX Lite you pay $99/year.
PureIDX Pro is $200 setup + $99 per year for hosting.
View QuestionTo get PureIDX you pay $99/year and it includes the website hosting, SSL certificate, IDXAddons access, Custom Subdomain setup, IDX Connect, IDX Premium Templates, Priority Email Support, and some template options.
We also offer a $200 setup + $99/year solution that includes a complete site setup. We set up for you the images, logo, widgets, etc.
View Question
Questions about IDX Broker
IDX is an acronym that stands for “Internet Data Exchange” and is also known as Broker Reciprocity.
IDX Broker is a vendor for listing data that allows agents and brokers to access and display listing information from various MLS on their real estate websites. The term “IDX” refers to the software, rules, and regulations which allow MLS data to show on your site. This data feed typically encompasses the listing data for properties entered into the MLS system, while IDX rules may determine where, what, and how it is displayed. If your MLS provides access to this data feed, you may use it to promote all eligible listings on your website, not just your featured listings.
IDX Broker is engineered to collect, organize, and maintain your local MLS listings, allowing you to seamlessly display all MLS properties on your real estate site.
View QuestionIDX works by establishing a data connection between your website and your MLS or IDX provider, importing listings, displaying them on your front-end, and running updates. Because IDX refers to any transfer of real estate data, the specifics of how it works depend on the type of IDX technology used.
View QuestionThis is a simple explanation of the process to set up IDX for your website.
- First, go to realtycandy.com/platinum and signup for an IDX Broker account (when you use that link, they will waive their $150 account creation fee.)
- IDX Broker will send the paperwork that you need to sign or have your broker sign.
- Once you get that done and send it back to IDX Broker, they will forward all of the documents to your MLS for approval.
- After the MLS approves your account, IDX Broker will send you (and us) an email.
- We will need you to click on the signup button on this page to hire us to set up your IDX feed to your site.
- We will also need you to send your site admin access and IDX Broker login details to our email address.
- Once we have your IDX account active, your payment, and your credentials, we just need one business day to get IDX Broker set up on your website.
If you sign up for our IDXConnect service at https://realtycandy.com/idx/, IDX Broker will waive their $150 processing fee.
View QuestionStudies show that most visitors to real estate websites want to see properties. Having information about your company and your experience is important, but the truth is visitors to your real estate website want to see properties.
You can show your own current listings using IDX Broker. This is a great option for teams and offices with at least 25-50 listings that provide enough interest to keep visitors engaged.
If you want the listings you show on your site to auto-update and show all of the current active properties in your MLS or market area, then IDX Broker is an easy way to showcase all of those properties.
Not only will you be able to use IDX Broker to showcase specific listings, but it can also help capture new leads and nurture existing clients.
You can even set up automatic updates, so your clients will know when new properties are available.
There are many more benefits to using IDX Broker that can help build your real estate business. Set up a free Zoom meeting with one of our team members, or give us a call to find out how we can help you grow your real estate business!
View QuestionIDX Broker offers two plans:
The IDX Broker ™ Lite plans start at $50/monthly for a single agent, $70/monthly for a team plan, or $100/monthly for an office plan.
The IDX Broker ™ Platinum plans start at $80/monthly for a single agent, $100/monthly for a team plan, or $130/monthly for an office plan.
They also offer the ability to add multiple MLS to one IDX Broker account.
You can check all updated features available on each plan on IDX Broker Plans & Pricing page.
View QuestionThe wrapper is just a page on your website for platforms like WordPress or Squarespace (or, for Wix websites it is a page on our servers) that will be used as a base for IDX Broker pages. IDX Broker pages are styled by taking the information on that specific wrapper page, including the styles for the header, the footer, and CSS classes to style titles and texts, and fonts.
View QuestionDid you make changes to your website and then when you go see your IDX pages, they showed up with a broken aspect?
Or did you do a website change, and it is taking hours for IDX to update your pages with the changes?
These are common problems our clients at RealtyCandy face, and fixing this is very quick. You just need to clear your IDX Broker Wrapper Cache.
Clearing the cache of Dynamic wrappers
To clear your wrapper cache, go to your IDX Broker Dashboard, then go to Design, Website, and Wrappers.
There will be a link “Clear Wrapper Cache” on the blue bar on the right. Just click on it once or twice, and try looking at the pages again.
Check the video to see the step by step on how to do it.
For Static Wrappers
If you did the IDX Connect service with us and have a Wix, Duda or GoDaddy website, you probably have a Static wrapper. In this case, the header and footer info will not update automatically. So, to have this updated, you will need to contact us though our chat or email and ask us to update it for you.
View Question
You can get any of the IDX Broker default links at Design > Website > Page Templates and copy the link for your site.
On your Wix website, click on the side icon “Menus and Pages” and then on the “Add a Link” icon.
Check the “Web Address” option and paste the URL you copied before, if you want you can make it open on the same page (tab) your link is by checking the “Current Window” option.
Type the name you want to appear on the menu, and Publish your changes.
If we want to block some IDX Broker pages from showing up in Google, IDX Broker recommends that on the wrapper of the page you want to block, you set it to “noindex“, then that should be applicable to the page as well.
That would keep the pages from indexing or showing in SERP or search engine results.
View Question